반응형
* C# 노트북 배터리 정보 예제...

- 사용한 컨트롤 : Button 2개, TextBox 2개, Label 3개, 프로그래스바 1개, Timer 1개
전체 소스 코드
Form1.cs
using System;
using System.Collections.Generic;
using System.ComponentModel;
using System.Data;
using System.Drawing;
using System.Linq;
using System.Text;
using System.Windows.Forms;
namespace CSharp_노트북전원상태
{
public partial class Form1 : Form
{
public Form1()
{
InitializeComponent();
}
protected override void OnLoad(EventArgs e)
{
base.OnLoad(e);
timer1.Interval = 1000; //1초 마다...
}
protected override void OnClosed(EventArgs e)
{
base.OnClosed(e);
timer1.Stop();
}
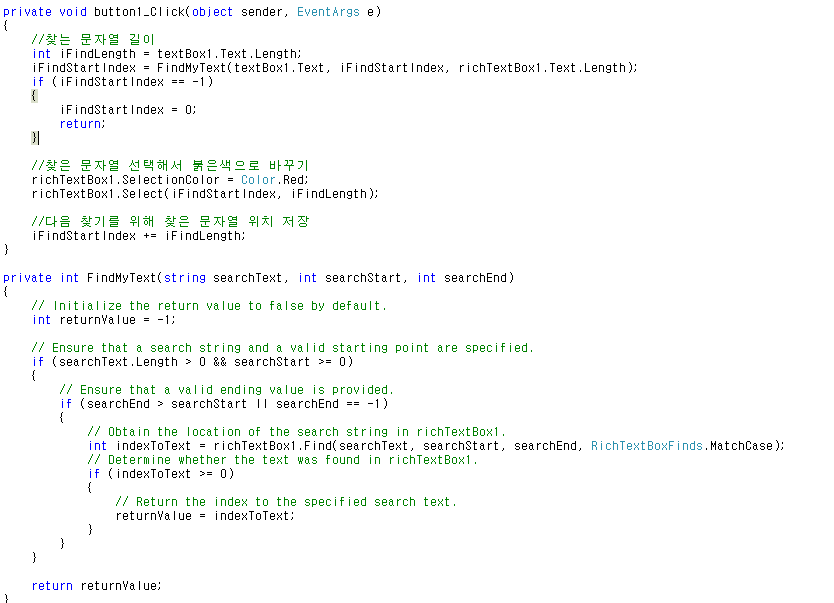
private void button1_Click(object sender, EventArgs e)
{
timer1.Start();
}
private void button2_Click(object sender, EventArgs e)
{
timer1.Stop();
}
private void timer1_Tick(object sender, EventArgs e)
{
PowerStatus psStatus = SystemInformation.PowerStatus;
//충전 상태
txtChargeStatus.Text = psStatus.BatteryChargeStatus.ToString();
//전원 상태
txtPoerStatus.Text = psStatus.PowerLineStatus.ToString();
//충전 비율
if (psStatus.BatteryLifePercent != 255)
{
pbCharge.Value = (int)(psStatus.BatteryLifePercent * 100);
}
else
{
pbCharge.Value = 0;
}
//잔여 사용 시간
if (psStatus.BatteryLifeRemaining != -1)
{
textBox1.Text = TimeSpan.FromSeconds(psStatus.BatteryLifeRemaining).ToString();
}
else
{
textBox1.Text = "-------";
}
//완충시 사용 시간
if (psStatus.BatteryFullLifetime != -1)
{
textBox2.Text = psStatus.BatteryFullLifetime.ToString();
}
else
{
textBox2.Text = "-------";
}
}
}
}

*예제 결과

반응형
'C# Programming' 카테고리의 다른 글
| [C#] 랜덤(Random) 클래스 를 이용한 간단한 로또(Lotto) 숫자 생성 (0) | 2021.02.01 |
|---|---|
| [C#] 프로그램 버전 확인 (Program Version Check) (0) | 2020.11.30 |
| [C#] [WMI] 그래픽 카드 정보 (Graphic Card) (0) | 2020.09.15 |
| [C#] [Control] richTextBox - 문자열 검색 (0) | 2020.08.17 |
| [C#] [Control] Listview - 조회 데이터 CSV 파일로 만들기 (0) | 2020.05.27 |