반응형
* VBNET Listview 에 Button, Progressbar, TextBox Control 삽입 예제...
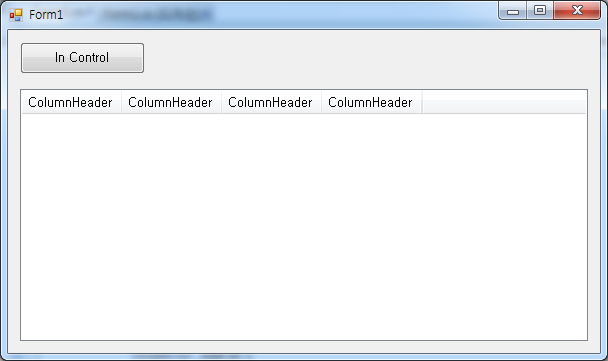
-사용한 컨트롤 : Button 1개, Listview 1개
전체 소스 코드
Form1.vb
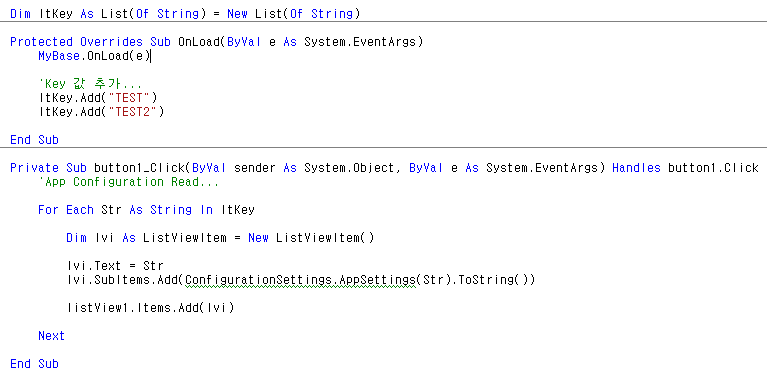
Public Class Form1
Dim ltControl As List(Of Control) = New List(Of Control)
Sub ControlDispose()
Dim iCount As Integer
For iCount = 0 To ltControl.Count - 1 Step iCount + 1
ltControl(iCount).Dispose()
Next
If ltControl.Count > 0 Then
ltControl.Clear()
End If
End Sub
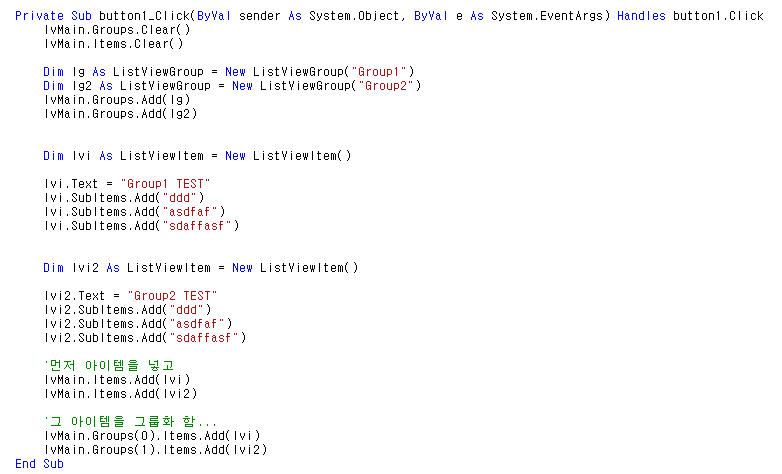
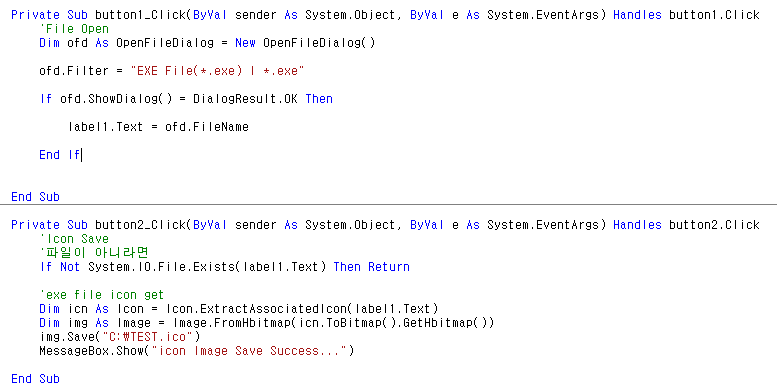
Private Sub button1_Click(ByVal sender As System.Object, ByVal e As System.EventArgs) Handles button1.Click
lvMain.Groups.Clear()
lvMain.Items.Clear()
ControlDispose()
Dim lvi As ListViewItem = New ListViewItem()
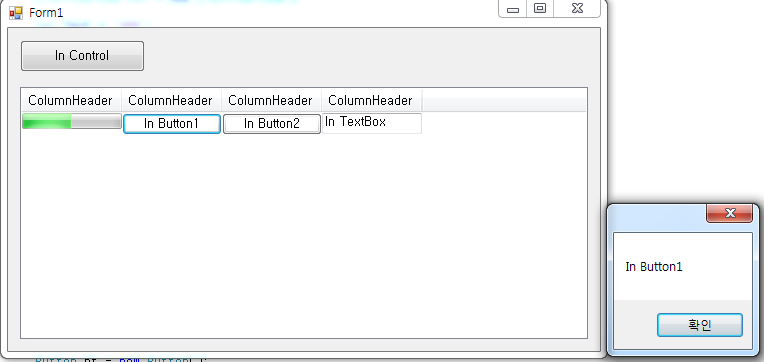
lvi.Text = "000"
lvi.SubItems.Add("111")
lvi.SubItems.Add("222")
lvi.SubItems.Add("333")
lvMain.Items.Add(lvi)
'객체를 어디에 담았다가 Dispose() 해주기...
'Control In 할 객체 만들기...
Dim pb As ProgressBar = New ProgressBar()
pb.Minimum = 0
pb.Maximum = 100
pb.Value = 50
pb.Parent = lvMain
'서브 아이템 얻어오기
Dim ps As ListViewItem.ListViewSubItem = Nothing
ps = lvMain.Items(0).SubItems(0)
'그리기
Dim rt As Rectangle = New Rectangle()
rt = ps.Bounds
pb.SetBounds(rt.X, rt.Y, 100, rt.Height)
ltControl.Add(pb)
Dim bt As Button = New Button()
bt.Text = "In Button1"
AddHandler bt.Click, AddressOf bt_Click
bt.Parent = lvMain
'서브 아이템 얻어오기
Dim ps2 As ListViewItem.ListViewSubItem = Nothing
ps2 = lvMain.Items(0).SubItems(1)
'그리기
Dim rt2 As Rectangle = New Rectangle()
rt2 = ps2.Bounds
bt.SetBounds(rt2.X, rt2.Y, rt2.Width, rt2.Height + 6)
ltControl.Add(bt)
Dim bt2 As Button = New Button()
bt2.Text = "In Button2"
AddHandler bt2.Click, AddressOf bt_Click
bt2.Parent = lvMain
'서브 아이템 얻어오기
Dim ps3 As ListViewItem.ListViewSubItem = Nothing
ps3 = lvMain.Items(0).SubItems(2)
'그리기
Dim rt3 As Rectangle = New Rectangle()
rt3 = ps3.Bounds
bt2.SetBounds(rt3.X, rt3.Y, rt3.Width, rt3.Height + 6)
ltControl.Add(bt2)
Dim tb As TextBox = New TextBox()
tb.Text = "In TextBox"
tb.Parent = lvMain
'서브 아이템 얻어오기
Dim ps4 As ListViewItem.ListViewSubItem = Nothing
ps4 = lvMain.Items(0).SubItems(3)
'그리기
Dim rt4 As Rectangle = New Rectangle()
rt4 = ps4.Bounds
tb.SetBounds(rt4.X, rt4.Y, rt4.Width, rt4.Height)
ltControl.Add(tb)
End Sub
Sub bt_Click(ByVal s As Object, ByVal e As EventArgs)
Dim bt As Button = CType(s, Button)
MessageBox.Show(bt.Text)
End Sub
End Class

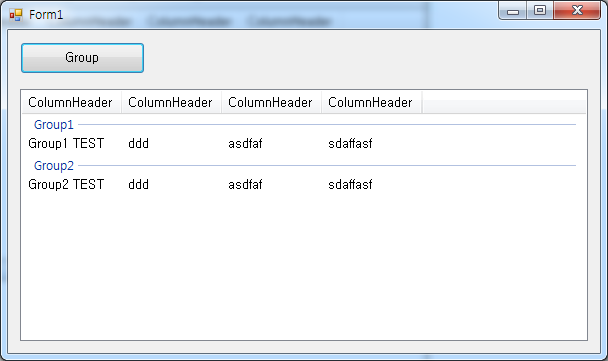
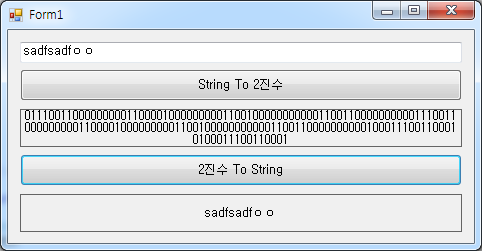
*예제 결과
https://kdsoft-zeros.tistory.com/210
[C#] [Control] Listview - Button, Progressbar, TextBox 컨트롤 삽입
* C# Listview 에 Button, Progressbar, TextBox Control 삽입 예제... -사용한 컨트롤 : Button 1개, Listview 1개 전체 소스 코드 Form1.cs using System; using System.Collections.Generic; using System.Com..
kdsoft-zeros.tistory.com
반응형
'VB.NET Programming' 카테고리의 다른 글
| [VBNET] [Control] Listview - BeginUpdate, EndUpdate 조회 속도 비교 (0) | 2020.05.22 |
|---|---|
| [VBNET] 움직이는 라벨 만들기 (0) | 2020.05.20 |
| [VBNET] [Control] Listview - 그룹화 항목 만들기 (0) | 2020.05.14 |
| [VBNET] EXE File iCon 가져오기 (0) | 2020.05.12 |
| [VBNET] App Configuration - Key & Value 값 읽기 (0) | 2020.05.08 |